
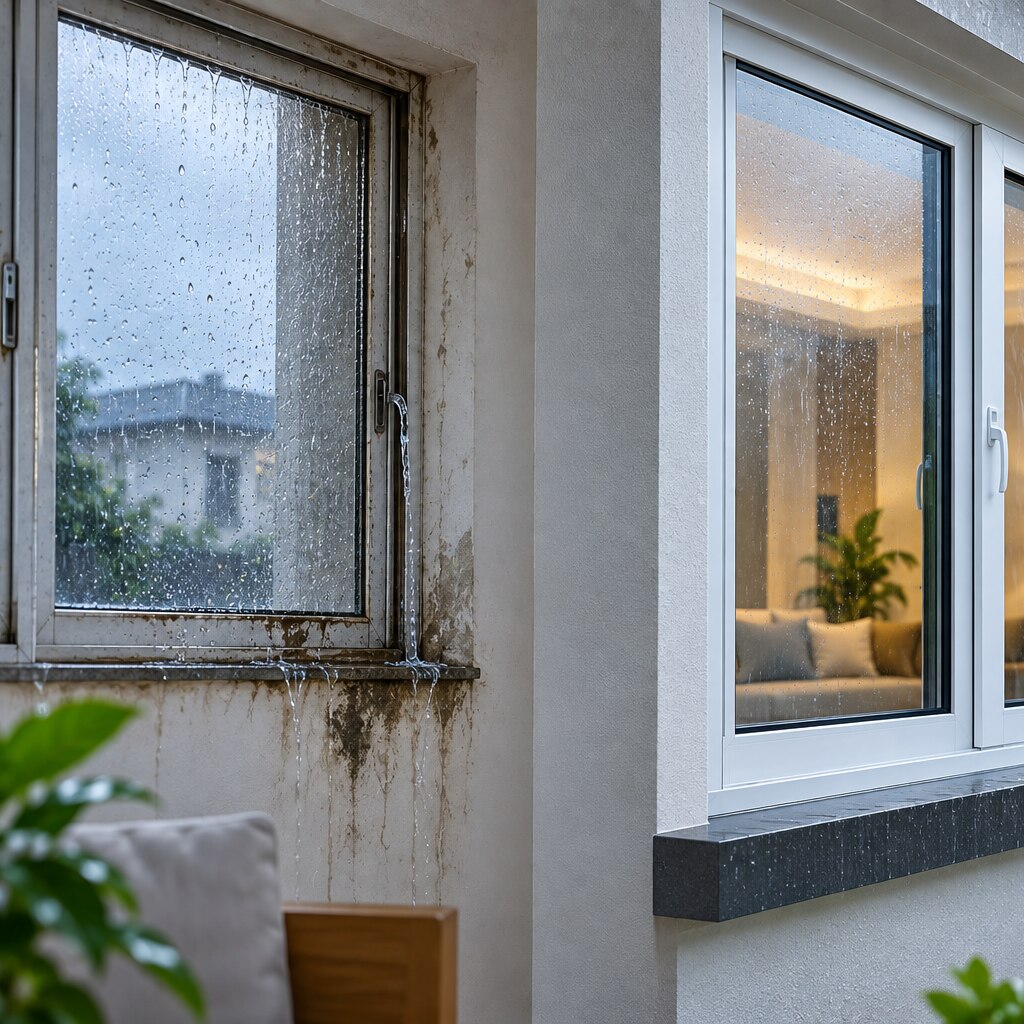
Damp reveals, peeling paint, mould and puddles after rain can point to a leaking window, but the window itself is not always the source. By the end, you will know how to trace the water, inspect the complete opening, test it safely and decide whether it needs cleaning, resealing, adjustment, repair or replacement.
Key takeaways
- Check damp reveals, peeling paint, swollen plaster and mould at frame corners.
- Rule out roof, plumbing, condensation and wall cracks before blaming the window.
- Inspect the sill, frame and wall joint for gaps, failed sealant or damage.
- Replace the window when repeated leakage continues after correct installation repairs.
Read the visible signs around the opening
Rainwater entering through or around a window leaves a pattern, not always a visible drip. Look for damp window reveals, peeling paint below sill, swollen plaster, or mould at frame corners; repeated wetting can leave the wall damp after the surface appears dry.
- Black or green staining on the wall, frame, or interior trim
- A musty smell concentrated around one opening
- Brown tide marks or staining on curtains beside the window
- Puddles on the interior sill or floor after rainfall
- Bubbling paint or trim that feels soft when pressed
| Visible sign | Stronger rain clue | What weakens the conclusion |
|---|---|---|
| Damp window reveals | Wetness appears after rain and follows the frame edge | Dampness spreads across the whole wall |
| Peeling paint below sill | Paint damage sits directly beneath the sill or at its ends | Paint is peeling throughout the room |
| Swollen plaster | A localised bulge or soft patch develops beside the opening | A plumbing pipe runs behind the same area |
| Mould at frame corners | Growth returns after wet weather, especially at lower corners | Mould appears on several cold surfaces during humid weather |
| Puddles after rainfall | Water collects at the sill or below one window soon after rain | Water appears without rain or follows floor cleaning |
| Water on room-side glass | Rain leaves marks at joints, corners, or the sill | Evenly spread droplets form during humid weather, indicating condensation instead |
Separate window leakage from other water problems
Trace when the water appears and where it starts. Window leakage diagnosis points to the opening when wetness follows rain, concentrates at a corner, sill or frame joint, and stops as the surface dries. Water that appears without rain needs a different investigation.
| Source | Clue that identifies it | What to check |
|---|---|---|
| Window | Wetness at the sill, frame corners or wall-to-frame joint after rain | External sealant, drainage outlets, gaskets and sash contact |
| Roof leak | A damp patch spreads from the ceiling or upper wall and worsens after prolonged rain | Roof slab, parapet, lintel and the wall above the window |
| Wall crack | A vertical or diagonal stain follows a visible crack beside or above the opening | Crack continuity, hollow plaster and the exterior face |
| Plumbing leak | Water appears during bathing, washing or tank use, regardless of rainfall | Pipes, bathroom walls and the room directly above |
| Condensation | Droplets form on room-side glass or the frame during humid weather without exterior rain | Indoor humidity, ventilation and cold surfaces |
| Balcony drainage | Water begins when the balcony holds or receives water, then tracks toward the opening | Floor slope, drain, threshold, edge seal and outlet |
For condensation versus rain leakage, wipe the glass dry and monitor it on a dry day; rain-related wetness returns after rainfall, while condensation follows humid indoor conditions. Do not replace the window until you rule out a blocked outlet, missing flashing, roof leak or wall crack.
Inspect the frame, sill and wall-to-window joint
Start at the highest wet mark and work outward, because water can travel along a sill or inside a wall before appearing at the frame. Check whether the sill slopes toward the exterior, projects beyond the wall, and has intact flashing or another visible route for water to escape.
- Examine the exterior sealant around every frame edge. Look for cracks, shrinkage, peeling, gaps at corners, or separation from uPVC or masonry.
- Clear dirt, insects, paint and plaster from the drainage holes and weep holes in the sill or bottom track. Do not permanently seal these openings; blocked outlets trap water inside the frame.
- Inspect the wall-to-frame joint above and beside the window for open cracks, swollen plaster, missing render, or staining that continues beyond the opening.
- Press along accessible gaskets for splits, flattening or sections that no longer contact the sash. A damaged gasket can admit wind-driven rain.
- Check sash alignment by closing and locking the window. Uneven gaps, rubbing, a loose handle or locking points that do not engage indicate that the sash is not seating against its seals.
- Inspect sliding-window tracks for construction debris and worn rollers. A sash that sits low or unevenly can leave the track unable to drain.
If the frame looks sound but dampness begins above the opening or extends into the surrounding wall, suspect a leaking lintel, balcony edge, parapet or wall crack rather than the window itself. Replacing the frame alone will not correct that entry route.
Test the suspected leak without making it worse
A controlled hose test should use a gentle, continuous flow, not a pressure nozzle, so you identify the entry point without forcing water past sound seals. Close and lock the sash, dry the interior, and place an observer inside while someone outside wets one area at a time. Start below the sill and move upward.
Do not spray upward into the track, weep outlets, joints or top edge. Hold each area for about five minutes, stop when water appears, mark the location, and allow the assembly to dry before repeating the test.
Use the least invasive fix that matches the failure:
- Clean the bottom track drainage channels and weep outlets when dirt, insects or construction debris block water escape. Do not fill the track with sealant.
- Reseal the exterior joint when cracked, separated or missing sealant shows sealant failure. Remove loose material and use a sealant compatible with the frame and wall.
- Adjust rollers, hinges, keeps or sash locking points when the sash closes unevenly, needs excessive force or leaves inconsistent gasket contact.
- Repair or replace a gasket, roller, latch or damaged frame component when cleaning and adjustment do not restore even contact.
A hose test cannot certify water resistance. For recurring or disputed leakage, request professional field testing with a calibrated spray rack and pressure difference, such as ASTM E1105. A failed test result also requires inspection of the wall-to-window joint, sill flashing and surrounding masonry.
Know when better installation or a new window is justified
Recurring leakage justifies professional correction when it returns after cleaning drainage outlets, replacing gaskets, adjusting sash alignment, or renewing local sealant. Leakage during strong wind-driven rain points to a pressure or installation weakness, not automatically to a defective glass unit or uPVC frame.
Do not order a new window before checking the complete opening. Ask for an assessment of:
- the wall-to-frame joint and any cracks above the opening
- sill slope, sill projection, flashing, and drainage outlets
- exterior sealant continuity and the condition of gaskets
- sash alignment, locking pressure, and frame distortion
- a continuous air seal around the installation gap
Mortar, loosely packed material, or deteriorated foam cannot replace a compatible continuous air seal. Low-expansion foam alone is not the exterior water-shedding layer. Missing flashing at a lintel, balcony edge, or parapet can keep leaking even after a sound window is replaced.
A new window is justified when the frame is cracked, warped, persistently misaligned, or fails a specified water penetration resistance test after the surrounding wall and drainage details are corrected. For difficult cases, request a calibrated spray-rack test with stated pressure, duration, and pass criteria; ASTM E1105 is one recognised method for installed exterior windows.
When comparing quotes, ask Nutec International or any installer to state whether the price corrects the opening, replaces only the frame, or includes flashing and perimeter sealing. Those are different scopes.
Related product
 | UPVC Doors and Windows - *Space-saving*: Perfect for small rooms or tight spaces - *Low maintenance*: No painting or polishing needed - *Energy-efficient*: Keeps your home... View product → |
Frequently asked questions
What signs show that water is entering around a window?
Look for damp window reveals, peeling paint below the sill, swollen plaster, mould at frame corners and walls that stay damp after rain.
How can you tell window leakage from another water problem?
Compare the damp area with rainfall, inspect nearby roofs and plumbing, check for condensation, and trace cracks or stains away from the opening.
How should you test a suspected window leak?
Inspect the frame, sill and wall-to-window joint first, then use a gentle controlled water test on one section at a time without blocking drainage paths.
When is a new window justified instead of another repair?
Consider replacement when the frame or sill is damaged, the joint repeatedly leaks after proper repairs, or the window cannot shed water through its drainage paths.